
This article has been archived, as it was published several years ago, so some of its information might now be outdated. For more recent articles, please visit the main article feed.
Review: Swift Playgrounds 3.0 for iPad
The Swift Playgrounds app for iPad has always been a bit torn between two vastly different kinds of use cases. On one hand, it was clearly built with a primary focus on education and being a great tool for beginners — but on the other hand, it also acts as the only way for professional developers to run Swift code locally on their iPad.
Interestingly, that sort of puts Swift Playgrounds in a very similar position as the iPad as a whole — in that it both needs to cater to casual and simple use cases, as well as act as a capable tool for more advanced ones, especially given the rising popularity of the iPad Pro as a complete computing platform.
This week, let’s take a look at how well the new 3.0 version of Swift Playgrounds walks that balance between simplicity and power, and how some of its new features really improves the ways it can be used as a highly portable, advanced Swift development tool.

Swift by Sundell is brought to you by the Genius Scan SDK — Add a powerful document scanner to any mobile app, and turn scans into high-quality PDFs with one line of code. Try it today.
Work, play, and education
It doesn’t take long to realize that the main purpose of Swift Playgrounds is to serve as a tool for students, educators, and for people who want to start learning how to code. Right after opening it up, the app prominently presents various coding lessons and learning challenges — and everything from the language used for menu items and commands, to the app’s release notes on the App Store, have a clear education focus.
However, once you open up a blank playground and start coding, the actual capabilities of the app have always been quite impressive — from the way it provides full access to the iOS SDK and Foundation, to how it lets us natively render views and view controllers using PlaygroundPage.current.liveView, to the speed of the compiler — especially on the latest iPad Pro models.
Version 3.0 also adds some very welcome improvements to the mix. For starters, the compiler has now been updated to the Swift 5.0 version, and the overall stability of the editor and the way it interacts with the compiler has also been improved. When a crash or runtime error occurs, the app no longer presents a simple alert view saying that something went wrong, but rather presents rich error messages next to the line of code that caused the error — and compilation errors are now displayed in an “Issues” list, similar to the one found in Xcode.
Modules made easy
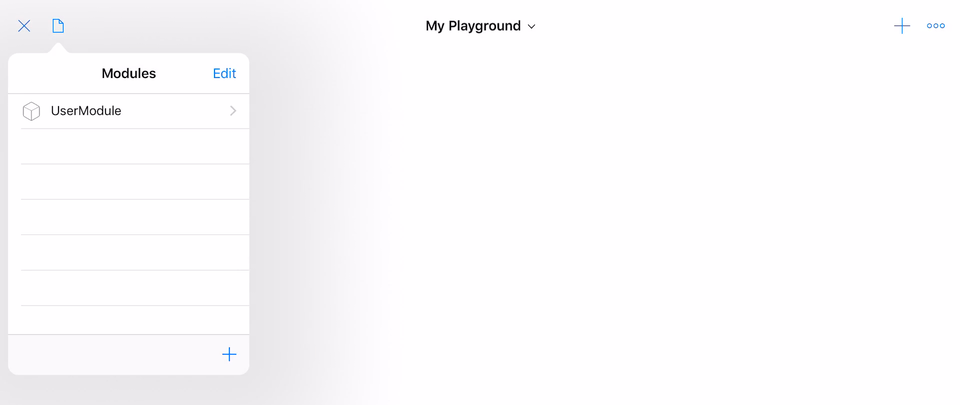
Perhaps the biggest improvement for developers looking to use Swift Playgrounds as a proper development tool, is the added support for modules containing multiple source files. Swift modules are essentially the “pure Swift” equivalent of a library or framework, and the way they’ve been integrated into the Playgrounds app is simply fantastic.
A new document icon can now be found in the top-left corner of the editor — and tapping it brings up a popover that lets us browse, and modify, the current playground’s source files and modules. Both new files and new modules can be added with a few taps, and any new source file is automatically opened up as a new tab within the editor. It’s seamless, fast, and makes it trivial to start splitting a larger piece of code up into separate modules. Each module is also automatically imported into the playground, while still requiring explicit imports between modules.
Compare the above to how many steps it takes to add a new Swift framework in Xcode.
Modularization can often be key in order to make it easier to maintain a project — especially as the amount of features and source files grows. By splitting things up into separate modules, each with its own responsibility and domain, we can both ensure a fair amount of separation of concerns — and also easily identify architectural problems, such as when two distinct pieces of code are too highly coupled, or when a view makes too many assumptions about the data that it’s rendering (since gaining access to such information would now require importing another module).
Modules also enable us to make use of the internal access control level, and make types and functions that are only meant for internal use within a module inaccessible from outside that module. Since internal is the default access level in Swift, that also means that we need to explicitly mark the types and functions that we wish to vend as part of our module’s public API as public. While some developers might consider that a bit of a ”chore”, it does sort of force us into the habit of designing more clear and well-defined APIs.
Xcode compatibility
Although Swift Playgrounds has now gained a lot of power and several new features that makes it a much more capable development tool, it’s far from a complete Xcode replacement for most use cases — nor does it even try to be. There are good reasons it’s called “Swift Playgrounds” and not “Xcode for iPad” (although hopefully we’ll see the latter at some point as well). It’s a tool for playing around with ideas, for doing lightweight coding on the go, and for building prototypes and isolated modules — rather than being a complete IDE with support for complex projects.
So since — for most developers — Swift Playgrounds will most likely act as a complement to Xcode, rather than a replacement, just how easy is it to move projects and code between the two? Sadly the answer is, for the most part, not that easy. Although apps like Working Copy (disclaimer: former sponsor), and tools like Shapeshift (disclaimer: written by me) makes it quite trivial to move actual source code between the Mac and the iPad — there’s unfortunately very little direct compatibility between Swift Playgrounds and Xcode.
For starters, they use different file formats. Xcode still uses the .xcodeproj bundle format it’s been using for years, and although Xcode-created .playground files can be opened on the iPad, the playgrounds that are created within the Playgrounds app itself uses the iPad-only .playgroundbook format.
The only thing Xcode 10 is able to do with Swift Playgrounds books is to display an icon — hopefully that’ll change come this year’s WWDC.
That means that even though we’re now able to easily create modules and file hierarchies on the iPad, once we wish to move our code back to the Mac (which, in case we’re building an app, we have to do at some point), we need to re-organize that code into something that’s Xcode compatible — for example by adding files to Xcode projects, and creating frameworks for our modules.
Hopefully future versions of both Swift Playgrounds and Xcode will bring a more normalized project format (how amazing wouldn’t it be if all of Apple’s developer tools used the Swift Package Manager and its Package.swift manifest to define projects?), which would make it much easier to transfer whole projects to and from the iPad — potentially opening up even more advanced use cases, and enabling us to edit whole apps on the go.
Enabling testability
Another aspect of Swift development that’s sorely missing from Swift Playgrounds on the iPad is support for unit and UI tests. Not only doesn’t the app offer any kind of built-in way to run tests, it doesn’t even come with the XCTest framework that most Swift developers rely when it comes to any form of automated testing.
So does that mean that writing tests on the iPad is completely out of the question? Thankfully not. For all of its limitations, Swift Playgrounds still houses the complete Swift compiler, and since XCTest is — at the end of the day — nothing but code, we could quite easily re-implement some of the core aspects of it right within Swift Playgrounds itself!
(It wouldn’t be a Swift by Sundell article without some code samples, right? 😉)
Let’s start by defining a “trimmed down” version of the XCTestCase class, but as a protocol instead. We’ll require all test cases to have an empty initializer (so that we can dynamically create instances), methods for setting up and tearing down each test run, as well as a Swift Package Manager-inspired allTests property to give our test runner access to each test method that we wish to run:
protocol XCTestCase {
    init()
    func setUp()
    func tearDown()
    static var allTests: [(String, (Self) -> () throws -> Void)] { get }
}
While we could’ve implemented XCTestCase as a concrete class instead, and make use of the Objective-C runtime in order to identify test methods — just like how XCTest itself does it on Apple platforms — that’d require us to mark each method with @objc, and would also make our code less portable in case we want to deploy it on platforms like Linux.
Next, let’s extend our XCTestCase protocol with a method that lets us run a given test case (by enumerating all of its methods and calling each one), as well as empty default implementations of setUp and tearDown:
extension XCTestCase {
    static func run() throws {
        let instance = self.init()

        for (name, closure) in allTests {
            instance.setUp()

            let test = closure(instance)
            try test()

            instance.tearDown()
        }
    }

    func setUp() {}
    func tearDown() {}
}
With the above in place, we’re now able to define test cases, but we also need a way to perform verifications and assertions as we write our actual testing logic. To facilitate that, let’s start by implementing the XCTFail function, which lets us fail a test in case a certain condition wasn’t met. We’ll give it an optional reason argument, and we’ll automatically record the name of the test function in which it was called, as well as the line number — like this:
func XCTFail(
    _ reason: String? = nil,
    testName: StaticString = #function,
    lineNumber: UInt = #line
) {
    let reason = reason.map { ", \($0)," } ?? ""
    assertionFailure("\(testName) failed\(reason) on line \(lineNumber)")
}
Using the above, we can now implement the XCTAssertEqual function, which’ll let us assert that the result of an operation turned out to be equal to the result we were expecting:
func XCTAssertEqual<T: Equatable>(
    _ lhs: T?,
    _ rhs: T?,
    testName: StaticString = #function,
    lineNumber: UInt = #line
) {
    guard lhs != rhs else {
        return
    }

    func describe(_ value: T?) -> String {
        return value.map { "\($0)" } ?? "nil"
    }

    // Here we pass on the test name and line number that were
    // collected at this function's call site, rather than
    // recording them from this call.
    XCTFail("\(describe(lhs)) is not equal to \(describe(rhs))",
        testName: testName,
        lineNumber: lineNumber
    )
}
That’s really all we need to start writing some basic tests. For example, here’s how we could now verify a that a Playlist type correctly keeps track of its songs, as well as make sure that its serialization code works as expected:
final class PlaylistTests: XCTestCase {
    static var allTests: [(String, (PlaylistTests) -> () throws -> Void)] {
        return [
            ("testAddingSongs", testAddingSongs),
            ("testSerialization", testSerialization)
        ]
    }

    private var playlist: Playlist!

    func setUp() {
        playlist = Playlist(name: "John's coding mix")
    }

    func testAddingSongs() {
        XCTAssertEqual(playlist.songs, [])

        let songs = (a: Song(name: "A"), b: Song(name: "B"))
        playlist.add(songs.a)
        playlist.add(songs.b)

        XCTAssertEqual(playlist.songs, [songs.a, songs.b])
    }

    func testSerialization() throws {
        playlist.add(Song(name: "A"))
        playlist.add(Song(name: "B"))

        let data = try JSONEncoder().encode(playlist)
        let decoded = try JSONDecoder().decode(Playlist.self, from: data)
        XCTAssertEqual(playlist, decoded)
    }
}
To run our above tests, we simply call run() on the test case’s type:
try PlaylistTests.run()It might not be a complete re-implementation of XCTest, and we’d have to keep adding each assertion function and test feature that we’ll need manually — but it shows that many different advanced development features are technically possible on the iPad — we sometimes just need a little bit of time and creativity to make them happen.
Swift by Sundell is brought to you by the Genius Scan SDK — Add a powerful document scanner to any mobile app, and turn scans into high-quality PDFs with one line of code. Try it today.
Conclusion
The 3.0 version of Swift Playgrounds for iPad is a fantastic update to an already delightful app — which adds powerful new capabilities and makes core development features, like error reporting, much more capable — all while still maintaining its focus on ease-of-use and educational content.
Swift 5, modules, tabbed editing and source file management are all great features that makes this version of Swift Playgrounds the most capable yet — and it’s a big step towards making it possible to perform many more Swift development tasks on the iPad. Just like when it comes to working on the iPad in general, using Swift Playgrounds sometimes requires a bit of extra patience and workarounds, but the result can often make for a powerful development environment on a highly portable device.
Swift Playgrounds is still not an “Xcode killer”, and it probably never will be, but that’s OK. While better interoperability with Xcode (especially in terms of file formats and project structure) and more advanced editor features (like refactoring and text replacement tools) would definitely be more than welcome, as long as I can quickly write Swift code on the go, I’ll be more than happy — at least while waiting for “Xcode for iPad” to arrive.
Questions, comments, or feedback? Contact me or send me a tweet @johnsundell.
Thanks for reading! 🚀